Pom-pom people
Ideal Number: Any
Amount of Time: 30-40 minutes
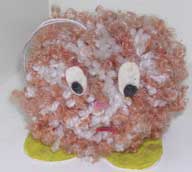 Pom-poms
can be made into all sorts of creatures by adding hands, feet and other features.
Pom-poms
can be made into all sorts of creatures by adding hands, feet and other features.
Start by making the pom-pom. This can done by cutting two circles of card and then cutting a second circle out of the centre of each one to give a ring. Place the two rings together and wind the wool around them. It is easier to use many short lengths of wool rather than one long one. To finish the pom-pom cut the wool buy running a knife or scissors between the two rings of card. Now tightly tie a length of wool around the middle of the pom-pom, you can use the rings as a guide. Young children may need help to tie the knots tightly. The rings of card can now be removed.
Decorate the pom-pom using scraps of felt, fabric and coloured paper. Feet
can be made by cutting feet shapes from card and backing them with felt. You
may like to include hats and hanging loops as finishing touches.
Bean bags
Ideal Number: Any
Amount of Time: 30 minutes
Been bags are ideal for learning to juggle with and are easy to make. Foods such as rice, beans or pasta make excellent fillings though beware, if such beans bag get wet they do not recover.
Cut two squares of fabric, about 10 cm is a good size. Put the square on top of each other so that their right sides are together (a right side is the one you want on the outside of the bean bag). Sew around three edges of the squares using a backstitch. Alternatively use two rows of running stitch with the second row worked between the first set to give a continuous line of stitching. Now turn the bag the right way out and fill about half way up. To finish off take the two side seams and place together (so that the squares are folded in half ) and sew together.
If you want to make bean bags to use regularly in games it is often best
to use a sewing machine to give a stronger result.
Tie dying
Ideal Number: Any
Amount of Time: 60 minutes plus drying time
Tie dying a great way to make plain fabrics more exciting. Cotton fabrics take the dye best. To run tie dying you will need some clothes dye, dark colours are best, and some string to tie knots on the fabrics to prevent the dye being taken up by the whole fabric.
There are several ways of tying the fabric each of which give different results. You can twist the fabric into a sausage and tie bands of string around it or you can gather a section of fabric and tie string around it. This is made easier by placing a small pebble in the centre of the section and tying around it.
Dye the fabric following the instructions on the dye packet. Try dipping different sections of the fabric into different coloured dyes. Leave the fabric to dry for a while before removing the ties. Then hang up until completely dry
To run this activity you could get everyone to bring a (white) T-shirt.
Alternatively make some squares of fabric from an old sheet. If you want these
to last you will have to hem the edges. These squares can be tied around the
neck as sun protection so why not try this at the beginning of you camp. If
time is short try using elastic bands instead of string to tie your fabric.
Batik
Ideal Number: Whole group
Amount of Time: 1 hour plus drying time
Batik is similar to tie dying but rather than string uses melted wax to resist the dye. However since it is difficult to remove all the wax, it is better to make wall hangings or flags rather than clothing. Again cotton fabrics take the dye best, you could use sections from old sheets. These should be hemmed to stop them fraying or could be stitched together to create a banner. Since wax is used you must use a cold water dye for this.
Wax chips for candle making are sold in most craft shops and are ideal for this. Melt the wax by placing it in a bowl over a pan of boiling water. Special tools can be obtained for dribbling the wax onto the fabric but you can just use a stick to drop the wax on. Once the pattern has been created dye the fabric following the instructions on the dye packet then hang up to dry.
To remove the wax iron the fabric between several layers of kitchen paper.
Do not use newspaper in direct contact with the fabric as the printing will
rub off.
Pen Pots
Ideal Number: Whole group
Amount of Time: 30 minutes +
The pen pot is made using an empty tin such as a bean tin. The type which have ring pull tops are good as they do not have such sharp edges but other ones can be used if care is taken to file the edges.
Start by cutting a rectangle of fabric which is long enough to go all the way around the tin. It should be high enough to have 3 or 4 cm turned in at the top. It is best to use quite a strong fabric as this will cover any sharp edges on the tin. It is also best to use fabric which does not fray too much.
Decorate the fabric either by embroidery, sewing or gluing on scraps of fabric, beads or sequins. The fabric is then glued onto the tin making sure that all the edges are glued to stop them form fraying.
An alternative method is to cut a circle as well as the rectangle. Sew
along the height of the rectangle to create a tube then sew the circle onto
the bottom. The tin can then be placed into the fabric which is then tucked
over the top edge. If you do not glue the fabric in place then it is best
to hem the top edge.
Badge hangers
Ideal Number: Whole group
Amount of Time: 30-40 minutes
These are a good way of displaying pin on badges. Start with a rectangle of fabric about 35*50 cm. This will then need to be hemmed along all four edges. Ideally this would be done before the session but with access to a sewing machine it doesn't take too long. You can use almost any kind of fabric although it does need to be reasonably strong. Hessian is good as it does not leave marks as badges are moved around.
The next stage is to create a channel along the top of the hanger to thread a cane through. Fold down the top edge and sew along with a running stitch. This could be done with thick cotton or wool to add decoration. The hanger can be decorated with Patterns sewn onto it. Try a running stitch in one colour then threading a length of thread in a second colour through the stitches.
To finish the hanger thread a length of cane through the top and tie on
a length of wool to hang it by. You could try getting several lengths of wool
bunched together and tying knots at intervals along it or plaiting strands
of wool to make this cord.
Screen printing
Ideal Number: Whole group
Amount of Time: 30-40 minutes
You could use fabric paints or ready mix paints for this depending on what you want to print. You can use the paper templates several times to reproduce the design.
A simple screen can be main using thick card such as old boxes form the supermarket and some old nylon tights. Cut a section from the tights, this should be a rectangle, which will be slightly larger than your finished screen. It is important that there are not holes in the nylon. You will then need to make a frame for your screen. Do this by cutting a rectangle from your card slightly smaller than your nylon. Leaving a border of about 3cm cut out the centre of the frame. Now cut a second frame of the same size. Glue the two frames together. Once they have completely dried stretch the nylon over the frame tightly and staple it down.
Alternatively a frame can be made from wood and the nylon stapled to this. This will give a screen which can be washed and used again.
The pattern is created by cutting or tearing shapes out of paper and laying them down onto the fabric. These are the areas which will remain the base colour.
Once the desired pattern has been created lay the screen down on top of it. Place some of the paint at one end of the screen. One person should hold the screen while the other scrapes the paint from one end of the screen to the other. This should be done using a rectangle of card the width of the inside of the frame. The screen can then be removed and the paper peeled away to reveal the pattern. One the paint has dried then a second colour can be applied over the first.
It is probably best to select a small number of colours and then have a
screen (or two if the group is large) for each colour. If you are using wooden
framed screens then they should be thoroughly washed before the paint has
time to dry.
Pen snakes
Ideal Number: Whole group
Amount of Time: 30-40 minutes
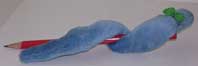 These
soft snakes have a wire in their centre allowing them to be wrapped around
a pen
These
soft snakes have a wire in their centre allowing them to be wrapped around
a pen
Start by cutting a length of wire about 20cm long. It should be thin enough to be bent easily but strong enough to hold it's shape, you could use a pipe cleaner. Now bend about 1 cm over at the ends to get rid if the sharp points.
Next cut two rectangles of fabric which are slightly longer than the wire and about 3-4 cm wide. Round off the corners to give a snake shape. Put the right sides of the fabric together and sew around the edges leaving a small gap at the tail. Use this to turn the snake the right way out, you may need to use a pencil to poke it through. Now stuff the snake using wadding or small scraps of fabric and insert the wire into the centre, this can be quite fiddly Now sew up the gap at the tail end.
To finish the snake add some features using wool or scraps of felt. Once finished it can be wound round a pencil.
Bean Bag Snakes
Ideal Number: Whole group
Amount of Time: 30-40 minutes
Using rice or small beans to stuff the snake allows them to be balanced on the hand as a puppet or draped over furniture.
Start with a rectangle of fabric about 25cm long and 12cm wide. Slightly stretchy material works quite well. Fold in half so that the right sides of the fabric are together and pin in position. Now round off the ends to create the head and tail shapes. Sew around the edges leaving a gap at the tail to turn the snake the right way out. Use wadding, small pieces of fabric or cotton wool to stuff the head. Then sew across just behind the head to seal in the stuffing. Use rice or small beans to stuff the body, you should fill about half of the remaining space. Sew up the gap at the tail. Use shearing elastic and sew a running stitch from the head about half way down the body down each edge of the snake. You can now gather the fabric on this stitching pulling one side tighter than the other will give a more snake like shape.
Use buttons, beads, wool and scraps of fabric to give the snake features