Snowmen
Ideal Number: whole group
Amount of Time: 30 minutes
 It's best not to make the dough up to far in
advance as it dries and sets quite quickly.
It's best not to make the dough up to far in
advance as it dries and sets quite quickly.
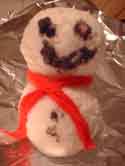
Start by grating the soap, you will need around half a bar per person. You can use any kind of soap (check you group for allergies first) though obviously for snowmen you will want white. Add a small amount of hot water to the soap (the hotter the better). Different soaps will take different amounts of water but you are aiming for a dough. Keep stirring and adding more water until you reach the desired consistency, It's unlikely you will melt all the soap without adding too much water so the dough usually has quite a grainy texture.
Take a small amount of the dough and roll into a ball, make a smaller ball for the head and press the two firmly together. If the balls have dried out use a wet finger to moisten them before sticking.
Use scraps of wool or fabric for scarves, you also use a cocktail stick dipped in food colouring to draw in features (though be warned that it does bleed in time)
Leave the snowmen for a couple of weeks to dry complexity before using them.
Christmas trees 1
Ideal Number: 4-8 per adult
Amount of Time: Two forty minute sessions
The Christmas tree is formed by setting a twig into a small pot. These can then be decorated with small items. You could use other themes such as message tree . Each child writes or draws a set of messages which they then swap with others and hang on the trees or try making a larger tree with a picture of each member of the group on it.
To work out how much plaster of Paris to make up fill the pot to the required level with water. Pour this into the container in which you will mix the plaster, Old foil takeaway containers are ideal. Add the powder to the water stirring gently until the mixture is the consistency of double cream. Tap the mixture on a hard surface a few times to remove any air bubbles. Pour the plaster into the pot and place the twig in the centre. This must be held in place until the plaster begins to set.
The easiest way to decorate the pots is to cut paper to size and stick it on
Almost anything can be hung on the tree. Have a second session providing lots of paper, glue fabric scraps, old bits of tinsel old greetings cards etc. to make the decorations.
Christmas trees 2
Ideal Number: 4-8 per adult
Amount of Time: 30 minutes
The Christmas tree is made form two pieces of card slotted together then decorated.
Cut two identical Christmas tree shapes from card. These can be very simple even just a triangle. Mark a line down the centre of each one. Make a cut along this line halfway up one tree and halfway down the other. Now slot the two shapes together. Decorate by gluing on scraps of coloured paper, tinsel and pictures cut form greetings cards.
Advent calendars
Ideal Number: whole group
Amount of Time: 1-2 hours
Although these take a long time to make it is easy to split the time across several sessions. It is a good idea to have a list of ideas for pictures as it can be difficult for children to think of 24 different ones.
Cut a out a square of stiff card to be a template for the doors, about 3 cm is a good size. Draw around this 24 times on a sheet of paper and cut round three sides of each square with a craft knife. Now take a second sheet of paper the same size as the first one and place it underneath the one with the doors. Open each of the doors and draw in the square in pencil. It helps to hold the sheets together with a couple of paper clips. Depending on the abilities of your group the children may be able to do this themselves.
Decorate the front of the calendar with felt tips of paint and then draw a picture in each of the squares on the back sheet. Glue the two sheets together being careful not to glue the doors shut.
You could make these in a variety of shapes or make one large on between the whole group. You could either open all the doors since you last meeting or count down group nights till Christmas. The children could split into groups to draw four pictures
Firework pictures
Ideal Number: whole group
Amount of Time: 20-30 minutes
Start by colouring a sheet of paper using wax crayons. Just colour sections of the paper in a variety of colours making sure that the wax is quite thick and that the whole of the paper is covered.
The next stage is to cover over the colours in black. You can either use a crayon or black paint. Adding a little PVA glue to the paint will help it to stick, also you need the paint to be quite thick so it nay help to use a powder rather than the ready mixed type.
Once the paint has dried you can create the fireworks. Gently scratch through the paint to reveal the colours. You could use a cocktail stick, pencil or even a worn out ball point pen.
Pumpkin lanterns
Ideal Number: whole group
Amount of Time: 2 * 40 minute sessions (need lots of adults for second session)
An alternative to hollowing out pumpkins Do not put candles inside
Start by blowing up a balloon and tying off the end. The bigger it gets the more work you have to do later so keep them fairly small. If you want to get the children to do it use a balloon pump.
Tear some newspaper up into small pieces (about 3cm square is ideal) and mix up some PVA with water (about 2 parts glue to 1 part water). Now use a large brush or dip the paper in the glue and cover the balloon. Try to build up a few layers all over the balloon and make sure there are no holes. It is best not to let the balloon get to wet. If an area does get wet stick some dry paper over it. Stand the balloon on an empty plastic container to stop it sticking to anything and leave to dry. This will take about a week
Once the balloon is dry draw on a face. These should then be cut out with a craft knife or small scissors. This is where you need all the adults as it can take some time. Young children need help in designing a face which can be cut out so you may want to give them some example faces. Also cut a hole for a torch, one on the bottom allows it to be held, one on the back allows it to be stood on a table.
Finally paint the balloon orange and when dry put a torch inside.
Ghost Mobiles
Ideal Number: whole group
Amount of Time: 30 minutes
For each ghost take a white tissue and put a cotton wool ball in the centre. Gather up the four corners of the tissue and tie round the cotton will ball to make the head. Leave a long strand of cotton attached to hang up the ghost.
Cut a circle from some stiff card and decorate as a moon, you could add fklying bats or whitches to add to the effect. Hang your ghosts form the moon.
Witches broomsticks
Ideal Number: whole group
Amount of Time: 30 minutes
Cut a strip of brown paper about 5 cm high and 15 cm long. Draw a line about 1 cm up along the long side of the stip. Now cut a fringe along the lenght of the strip making sure that you do not cut so that the firnge holds together. Soread some glue along the uncut section of yuor paper and wrap tightly around the top end of the pencil to form the twigs of your broomstick. You may find that you need a bit of sticky tape to keep it attatched to the pencil as well as the glue.
Now draw and cut out a witch from some thin card and colour it in. Use sticky tape to attatch the witch to hte broom. How about drawing some spooky pictures with them when you've finished.