Woven mats
Ideal Number: Whole group
Amount of Time: 15-20 minutes
These mats are great for place mats at parties. You could use either coloured paper or white paper which the children can decorate with felt tip pens.
Start with a piece of paper about A4 size, mark it into strips length ways about 2cm wide. Leaving a border of about 2cm at either end use a craft knife to cut along the lines. You should end up with a series of strips joined together at both ends which forms the basis of the mats.
Take a second sheet of paper and cut into 2 cm strips widthways. You can now weave these strips through the mat using a glue stick to secure the ends.
Helicopters
Ideal Number: Whole group
Amount of Time: 5-10 minutes
These are really easy to make and seem to work whatever you do to them.
Start with a rectangle of paper, a sheet of A4 cut length ways in three is about the right size. Fold the long sides together and crease to mark the centre line. Make a cut about 10cm long down this line. Now at the opposite end of the paper fold the corners into the centre as you would for a paper plane. Do this twice and then fold the point up about 2 cm. At the top bed one of the flaps down forwards, turn over and repeat. Throw the helicopter up and watch it twirl
You can decorate the helicopter with felt tips to create interesting patterns as it falls
Dragons
Ideal Number: Whole group
Amount of Time: 20 minutes
Start with two strips of paper about 3 am wide and 25 cm long. You can vary these sizes to create different size bodies. Stick the ends of the strips together so that they form an L shape. Now with the paper on a flat surfaces take the bottom strip and fold it across keeping the L shape. Repeat until the end of the strips which should then be stuck down. Finally cut a head, tail and some legs from card and stick them to the body
Money Pigs
Ideal Number: Whole group
Amount of Time: a long time
You might need to do these over a couple of sessions as it takes quite a long time to build up the layers of paper. You can use either wall paper paste (making sure it does not contain fungicides) or watered down PVA. The glue need to be quite runny so that the paper absorbs it
Before the session blow up a balloon for each child and tie off the ends. Using torn up squares of newspaper dipped in the glue mixture cover the balloon. You need to make sure that the edges off the paper are stuck down. Provide some large brushes for sticking down edges. The paper needs to be at least four layers thick around the whole balloon. Cut five cups from an egg box, stick on four as feet and one as a snout. The balloon then needs to dry, it takes about a week for it to become properly hard.
Cut a slit in the top of the pig large enough to take a coin. If you make it big enough you should be able to use a blunt knife to retrieve the money.
Finally paint your pig
Paper pulp
Ideal Number: Whole group
Amount of Time: 30 minutes plus preparation
The paper pulp is a modelling material which can be used like play dough or clay and will dry quite hard when left. It can be very messy to use.
Start with four sheets of newspaper (that is both pages), tear then in half and scrunch into balls. Put this in a pan with 4 litres of water and leave for 24 hours. Now boil for 20 minutes. This helps the paper to break down and also helps stop the newsprint coming off so easily. Once the paper has cooled put it into a blender and blend into a paste. Strain the pulp through a sieve to remove most of the water. Finally stir in a tablespoon of PVA glue and the pulp is ready to use.
When modelling with paper pulp more water will squeeze out so make sure you put down plenty of newspaper. The Pulp models can be left to dry naturally of can be put into a low oven to speed things up.
You can make different coloured pulps by adding powder paint to the mixture after you have strained it or by using different coloured newspapers. Once made the pulp can be kept in a plastic bag to stop it drying out but will go mouldy of left for too long
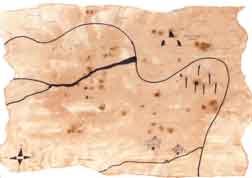
Treasure maps
Ideal Number: Whole group
Amount of Time: 30 minutes
 Simple
but very effective.
Simple
but very effective.
Draw your map onto a sheet of white paper. Simple black outlines are very affective or bold coloured pencils. Felt pens are not idea for this as they tend to run when the map is aged.
Be sure to make where the treasure is buried. You could also write instructions to get there (e.g. 10 pace north form the large coconut tree, turn to face the river.....)
Now to make you map look old, tear around some of the edges. To colour the paper use a tea bag soaked in hot water and dab it across the page. Try not to rub to much as it will tear the paper. Finally you can use a few granules of coffee placed on the dap paper to create darker stains.