|
|
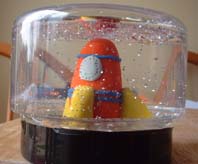
Snow Storms
|
Age Group: 6+
Ideal Number: Whole group
Amount of Time: 2 half hour sessions |
|
 You
will need a small jar with a well fitting lid for each person. You
will need a small jar with a well fitting lid for each person.
Use polymer clay (such as fimo) to create a model to go inside you snowtorm.
Ensure that it will fit inside the lid of your chosen jar and allow the jar
to be closed over the top. The clay must them be baked until hard.
Use a hot glue gun or waterproof glue to attach you model to the inside
of the jar lid. Place a small amount of glitter in the jar and fill with water
almost to the top. New fasten the lit tightly. For extra security you could
glue the lid on.
|
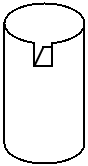
Money Boxes
|
Age Group: 6+
Ideal Number: Whole group
Amount of Time: 1/2 hour |
|
It takes a while to gather up all the containers for this so you will need
to plan it in advance
Use the cardboard drums from gravy mix or cocoa powder (the type with the
press on plastic lids). Using a craft knife cut a slit either in the lid of
on the side of the drum (about 2 cm from the top) making sure it is large
enough for a coin to fit through. You may want to do this before the session.
Decorate the money box by sticking on coloured paper. If you want to paint
it you might find that a coat of acrylic primer will help powder paints to
stick.
|
Fish Tank
| Age Group: 6+
Ideal Number: Whole group
Amount of Time: 3/4 hour |
|
An interesting alternative to mobiles.
Take and empty cardboard box (such as a shoe box) or large ice cream tub.
Paint the inside of the box with a underwater scene. If the box is plastic
you will need to do this on paper then glue it in.
Make fish and other underwater creatures from cardboard. Hand these form
the top of the box so that the open side of the box is facing forwards. Make
plants from stiff card and stick to the bottom of the box. You could also
glue shells or sand to you sea floor.
If your box has a lid you can cut out the centre of it and replace it with
clear plastic (or cling film) to form a side for your tank of you could leave
it open so that you fish move in the breeze.
You could also try making different scenes, how about the sky or an alien
landscape.
|
Printing Blocks
|
Age Group: 6+
Ideal Number: Whole group
Amount of Time: Half an hour |
|
The basis for these printing block is thin sheets of plastic packaging foam
(of the type used for packing electrical equipment)
Cut out s shape from the foam, simple shapes work well. Glue this to a piece
of stiff card or a block of wood. Remember that the shapes will come out the
opposite way round when printed. If you want to use the block straight away
it is best to use a glue stick. Use a paintbrush to apply a thin layer of
paint to the block and press it firmly onto the paper.
Try getting each child to make a block then sharing with the rest of the
group to print the pictures.
You can also create printing blocks by gluing lengths of string to this
card though this is more fiddley and results in a lot of sticky fingers.
|
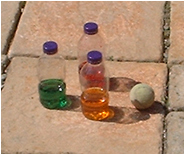
Glitter scenes
|
Age Group: 6+
Ideal Number: Whole group
Amount of Time: Half an hour |
|
Unfortunately the best bottles for these tend to contain highly coloured
fizzy drinks but any clear plastic bottles with screw tops will work.
Cut shapes from coloured plastic cartons, these must be small enough to
fit through the neck of the bottle. You could also put in small plastic toys.
Put the shapes in the bottle and half ail it with water, add a couple of teaspoons
of glitter and screw on the top.
Next take a piece of paper which covers about half the bottle and draw a
background for your scene. Stick this on using stick tape. The bottle should
lay on it's side with the paper covering the back. You can make a stand for
your glitter scene from cardboard of use some plasterscene to stop it rolling
around. Shake and watch.
Instead of glitter you could use a squirt of washing up liquid and have
a bubble scene. You could also add a couple of drops of food colouring to
the water.
|
Oil Burner
|
Age Group: 13+
Ideal Number: One or more
Amount of Time: Over 60 mins. |
|
The oil burner is a superb way to reuse and old fork and spoon. You will
require some needle nose pliers, a drill with a small metal bit and some way
to apply solder to things.
Firstly we must bend the fork to form a stand. The fork is bent 180 degrees
in the middle and the outer two prongs are bent down so the fork can balance
on its heel using the two prongs to stabilise it.
Now we must attach the spoon (oil reservoir) to the fork. We drill two small
holes at the heel of the spoon so we can slide it onto the fork, the bowl
of the spoon should be pointing away from the prongs. The spoon should be
sealed into place with solder. This can be applied with a soldering iron or
by wrapping solder around the joint and melting it with a miniature blow torch
(the torch must be small or you will discolour the metal).
The final touches to the oil burner are to bend the middle prongs of the
fork to support a night-light candle and to bend the bowl of the spoon around
to sit directly above the night-light.
|
Toys and Games
|
Cup and Ball game
|
Age Group: 6+
Ideal Number: Whole group
Amount of Time: 20 minutes |
|
Practice your catching skills
Start by taking half a sheet of newspaper and screwing it into a tight ball.
Secure this with a couple of pieces of stick tape. Now attach a length of
string (about 30cm long) to the ball. Using more sticky tape attach the other
end of the string to the cup about half way down the outside.
You can decorate the cup either by sticking on coloured paper or by painting
it with a mixture of paint and PVA glue.
|
|
Skittles
|
Age Group: 6+
Ideal Number: Whole group
Amount of Time: Half an hour |
|
|
 You
can use any plastic bottles with screw tops though it may be best to have
enough of each sort for one set of skittles. You
can use any plastic bottles with screw tops though it may be best to have
enough of each sort for one set of skittles.
Fill each bottle to about 2cm deep with sand. This stops the skittles falling
over to easily. Screw on the tops and decorate by sticking on coloured paper.
Experiment with different bottles.
Instead of sand you could partiality fill the bottles with water. You could
also make table top skittles using small bottles
Alternatively you could completely fill the bottles with sand and use them
as markers when playing games.
|
|
Paddle boats
|
Age Group: 6+
Ideal Number: Whole group
Amount of Time: Half an hour |
|
|
Take a rectangular plastic container (such as a margarine tub) it must not
have holes in the bottom. Attach a stick down each of the long sides using
sticky tape or elastic bands. The sticks need to be about 10cm longer than
the plastic carton and should overhang on the same end.
Cut a rectangle about 8cm * 4cm from a margarine tub lid. Use a hole punch
to make a hole half way down the long edge on each side of the rectangle This
is you paddle. Thread an elastic band through both holes. This should leave
you with a loop at each side of the rectangle. Hook the sticks through these
loops. Wind up the elastic band by turning the paddle then put the boat in
the water and let it go.
|
|
Musical Instruments
|
Warblers
|
Age Group: 6-9
Ideal Number: Whole group
Amount of Time: 10-15 minutes |
|
 These simple toys make a quiet sound rather like a bird warbling.
Take a plastic film container (ask at your local film developing shop to
see if they will save them for you). Start by piercing a hole in the bottom
using a sharp point or hot skewer. You may prefer to do this before the session.
Now remove the lid and using scissors cut a slit about 1.5 cm long. Cut a
second slit about 1 cm away giving you a flap. Push this flap inside the container.
Thread a length of wool through the hole in the bottom of the container, tying
several knots inside. It should be about as long as the persons leg. It is
important to use wool not string so that it will break if it gets tangled
around anything and will not harm anyone. Finally replace the lid, if your
slit was large you may need to use some tape to hold it on.
To work the warbler you will need to be in a large open space. Whirl it
around and listen. It is safest the work it in vertical circles so that you
can see that it will not hit anyone.
|
Drums
|
Age Group: 6-9
Ideal Number: Whole group
Amount of Time: 10-15 minutes |
|
Make a variety of drums, use different things to beat them and explore
the different sounds
Take a cardboard tube or solid box and a balloon. Cut the neck off the
balloon and stretch it over the tube. The children often need to work in pairs
to do this. Having done that tape the balloon in position.
Experiment with different tubes, different sizes, lengths, open or closed
at the end. Try putting rice inside the drum or stretching a couple of elastic
bands over the skin. Also try hitting the drum with different things, your
hand, a strew, a pencil etc.
|
Guitar
|
Age Group: 6-9
Ideal Number: Whole group
Amount of Time: 10-15 minutes |
|
This is really simple to make, take a cardboard box and tape the end shut.
Now take a rectangle of strong card. Fold it into three and tape into a triangle
(like a Toblerone) glue this to the top of the box about a quarter of the
way along. This acts as a bridge and allows the strings to sound properly.
Now stretch elastic bands around the box
You can tune the guitar by varying the tightness of the bands, pull some
of the elastic band round the back of the box for a higher note. You can also
press the string down with your hand like on real guitar
|
Maracas
|
Age Group: 6-9
Ideal Number: Whole group
Amount of Time: Three sessions of 30-40 minutes |
|
These take longer to make than any of the other instruments but are very
effective. Start by tearing lots of newspaper into small pieces. Now take
a Partially blown up balloon or a potato and cover in Vaseline. Using plenty
of glue cover the balloon in several layers of the newspaper. It needs to
be quite thick. Leave this to dry until completely hard.
Using a craft knife cut the ball in half and remove the balloon or potato.
Place some rice, dried peas or something similar into one half. Now using
more strips of paper glue the two halves together. Finish with a layer of
white paper or kitchen roll. This makes it easier to paint. If you want to
create a handle then cut a small notch out of both halves before gluing them
together and insert a length of doweling. If you glue a bead to the end it
will be easier to keep it in place. Make sure there are plenty of strips of
paper on the outside holding it in place.
Once the final layers of paper are dry you can paint your maracas. You
may also like to varnish them to give a tougher finish. This will also help
to waterproof them.
|
Rain Stick
|
Age Group: 6-9
Ideal Number: Whole group
Amount of Time: Half an hour |
|
An interesting variation on the standard dried pea shakers
You will need four paper cups, start by cutting the bottom out of one of
them and some small holes in the bottom of a second. Now cut two circles of
card drawing round the open end of a cup to get the size. Cut small holes
into both of these circles. The holes need to be big enough to let the rice
or peas fall through gradually.
Now take a compete cup, the cup with no bottom and one of the circles of
card. Sandwich the card between the two cups which should be placed with the
tops together. Tape all this into position. Tape the cup with holes in the
bottom and tape this (bottoms together) onto the bottomless cup. Now place
a handful of rice or dried peas into your rain stick. Sandwich the final circle
of card between your final compete cup and the rest of the rain stick.
|
Quick Instrument Selection
|
Age Group: 6-9
Ideal Number: Whole group
Amount of Time: 10-15 minutes |
|
Great for adding variety to your band or sound effects to your play
Put rice, peas or sand into a container with a tightly fitting lid and
decorate
Thread foil milk bottle tops onto a length of strong. Shake to make a gentle
noise
Make a hole in the through bottle top by hammering a nail through them.
Thread three or four onto a nail and hammer into a length of wood. Put five
of six sets on the finish your rattle.
Take two blocks of wood and glue sandpaper to one side. Rub the blocks
together. Make sure you rub the papered sides together or you will find your
blocks getting smaller!
Take two block of wood. Sand until smooth and bang together.
Fold a piece of card concertina style. Open it out so that you have a series
of ridges. It can be strengthened by gluing it into a second piece of card.
To play run a stick across the ridges.
|